EXTENDED EMPLOYMENT
The Extended Employment program provides support for clients with the most significant disabilities so they can maintain employment after services from the Vocational Rehabilitation and Blind Services (VRBS) program have ended.
Funding for job supports moves from VRBS to the Extended Employment program and there is no interruption in client services. Continuous follow along support is provided to the individual and the employer to ensure long term job retention.
Extended Employment is only available to consumers being served by VRBS. To become involved in VRBS, please contact your local VR Office.
For more information on Extended Employment, please contact:
1 (877) 296-1197
hhseevrbs@mt.gov
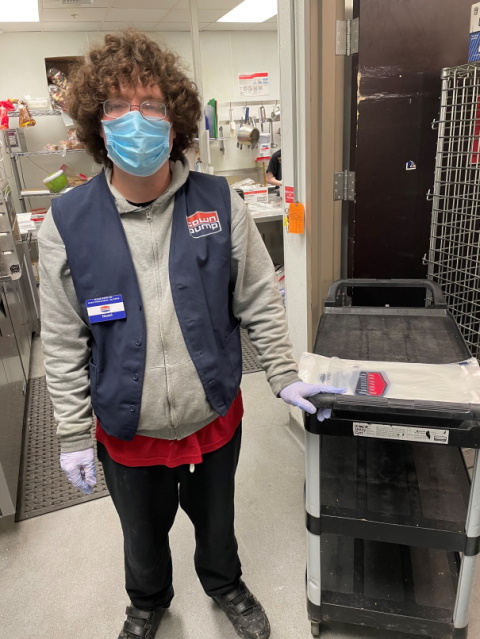
Example pictures of EE clients at work


Extended Employment Providers
The Extended Employment Program (EE) provides long-term employment supports for clients exiting the Vocational Rehabilitation and Blind Services (VRBS) Program who do not have another funding source available to provide the supports needed to maintain employment. EE provides 3 different service types to over 260 Montanan’s with disabilities each month. There are different tiers of service within each service type.
-
- Community – an individual with a disability working a real job alongside non-disabled individuals and earning wages (minimum wage or higher) comparable to other non-disabled individuals in similar jobs is provided individualized supports by a job coach to assist them in maintaining employment.
- Community has 7 tiers of service. Tiers 1-6 are paid at a flat rate based on hours per month of support provided to an individual. Billing Tier 7 is for services provided to clients who need more than twenty-four hours per month of support and is paid at an hourly rate.
- This the primary service provided by EE. Currently there are over 225 Montanan’s with disabilities being supported to maintain community employment across the state.
- Community – an individual with a disability working a real job alongside non-disabled individuals and earning wages (minimum wage or higher) comparable to other non-disabled individuals in similar jobs is provided individualized supports by a job coach to assist them in maintaining employment.
-
- Crew – a small group of persons with disabilities working at several locations within the community, under the supervision of a job coach. The type of work usually includes janitorial or groundskeeping and is an opportunity for individuals with disabilities to earn a wage while also learning skills that will assist them when entering community employment. People with disabilities working on a work crew are primarily working with other individuals with disabilities yet have exposure to people who do not have disabilities in the community locations where they are working. Most are paid minimum wage or higher.
- Crew has 3 tier of service that are paid at a flat rate based on hours per month the client worked on the crew.
- There are currently 18 individuals being supported by EE in crew employment in Montana.
- In order to encourage transition to competitive integrated employment, every year of a client's employment on a work crew the EE provider must hold and document a formal meeting with the client and other interested stakeholders to explore transition to competitive integrated employment.
- Crew – a small group of persons with disabilities working at several locations within the community, under the supervision of a job coach. The type of work usually includes janitorial or groundskeeping and is an opportunity for individuals with disabilities to earn a wage while also learning skills that will assist them when entering community employment. People with disabilities working on a work crew are primarily working with other individuals with disabilities yet have exposure to people who do not have disabilities in the community locations where they are working. Most are paid minimum wage or higher.
-
- Facility – an individual is receiving employment services in a setting where the majority of employees have a disability and are receiving continuous job-related supports and supervision and are paid less than minimum wage at a rate that is typically based on production. Facilities are also referred to as workshops, sheltered workshops, day treatment centers and work activity centers.
- Facility has 7 tiers. Billing in Tiers 1 and 2 is for services provided to clients who do facility work only, while billing in Tiers 3 through 7 is for services rendered to clients doing a combination of facility work and community-based or crew work.
- There are currently 18 individuals being supported by EE in facility employment across the state.
- In order to encourage transition to competitive integrated employment, every year of a client's employment in a facility the EE provider must hold and document a formal meeting with the client and other interested stakeholders to explore transition to competitive integrated employment.
- Facility – an individual is receiving employment services in a setting where the majority of employees have a disability and are receiving continuous job-related supports and supervision and are paid less than minimum wage at a rate that is typically based on production. Facilities are also referred to as workshops, sheltered workshops, day treatment centers and work activity centers.
Services that are Billable
The majority (more than 50% of invoice) of the billable activity taking place for an EE client is:
- On-site job checks with clients and employers
- In select cases where on-site checks are not an option or the client prefers and chooses off-site checks, in-office meetings with the provider to discuss work-related topics are appropriate.
- Job coaching at the job site, including:
- Time spent modeling the job tasks of the client as a mode of teaching, correcting, or improving performance and then allowing the client to demonstrate the modeled tasks
- Supports and training to encourage job promotion and/or career advancement
- Development of skills that will make the person eligible for more work hours or for additional job duties
- Training in job retention skills, such as meeting productivity standards and achieving quality results, attendance and punctuality, problem solving, workplace etiquette, and workplace safety
- Development of workplace social skills, appropriate workplace attire, acceptable hygiene, appropriate interactions with supervisors and co-workers, and acceptable work behaviors
- Facilitation/training of natural supports at the worksite
- Acting as an advocate for the client at the workplace specifically for the purpose of helping him or her remain employed
- Supports and intervention in situations where the client’s job is in jeopardy
Additional activities that are billable but take place much less frequently are:
- Substantial communication, in-person or via email, text, or phone, to clients regarding employment issues necessary and directly related to job maintenance, retention and/or promotion. However, time spent on non-vocational issues is not billable to EE. This may include texting and e-mail of a substantial amount.
- Submitting wage information to Social Security and/or other agencies as required on behalf of client
- Annual review of EE Plan and completion of required forms billable at no more than 60 minutes once per year
- Acting as an advocate for the client in interactions with persons not directly affiliated with the employer, e.g. family members, bus drivers, case managers, mental health providers, and landlords, with the objective of helping the client remain employed. Documentation must clearly demonstrate a relationship to maintaining employment.
- Travel:
- Whenever possible, EE Provider staff must minimize travel expenses by visiting multiple clients on the same trip. These may be other EE clients, or VR or DD clients. If two or more clients are visited on the same trip, the cost of travel is divided evenly between the clients' respective funding programs. Billing full travel time for each client and not dividing the time will be considered double billing.
- EE Providers may bill for portal to portal transportation of staff, for example, transportation by the job coach from the provider office to the client job site and back again.
- There is no reimbursement for mileage, so billing should reflect only time spent traveling and support at the job site.
- Participant no shows out of town are billable for the travel time
Additional Billable Activities for Self-Employed clients ONLY:
- Supports need to be defined and approved by EE Program Manager prior to transition to EE for self-employed clients
Additional Billable Activities for Crew ONLY:
- Time spent transporting clients from the EE Provider office for crew-based work and back again afterward
Additional Billable Activities for Facility ONLY:
- Only time spent on work tasks while at the workshop is billable to EE
Services that are NOT Billable
Payment will not be made for the following services:
- Transporting of clients
- Assistance that is not job-related, for example providing services that are considered Supported Living Services, such as going to doctor appointments with clients, assisting with shopping, assembling furniture, attending/facilitating recreational outings etc.
- Leaving messages or reviewing messages (phone, e-mail, texts, etc.) from clients
- Scheduling appointments with clients
- Staffing and reviewing cases internally including onboarding of new staff of the EE Provider agency
- Time spent documenting case notes
- Extensive, frequent and long meetings with family members when the client is not present
- Extensive, frequent and long meetings with clients that are on medical leave from work
- Any service for which the client has funding from what could be considered a collateral source. EE is the funding source of last resort.
- Multiple EE Provider workers meeting with a client and both billing for that time separately is considered double billing and will not be paid
While EE providers may provide any of the above-named NOT Billable services to clients at their own discretion, they may not include time spent on them in their billing hours.
EE Provider Manual
- Complete the required sections of this OM300-B form for Madison and OKTA Access.
- In the “Please list access requested here” section, please input “Madison”
- In the “Justification” section, please input “Provider worker needs access to Madison for submitting case notes and billing for clients of the Extended Employment (EE) program.”
- Sign the form.
- Return it to the EE Program Manager (Lacey.Conzelman@mt.gov) via email or ePass.
- EE Program Manager will notify the user that their Madison Access has been set up.
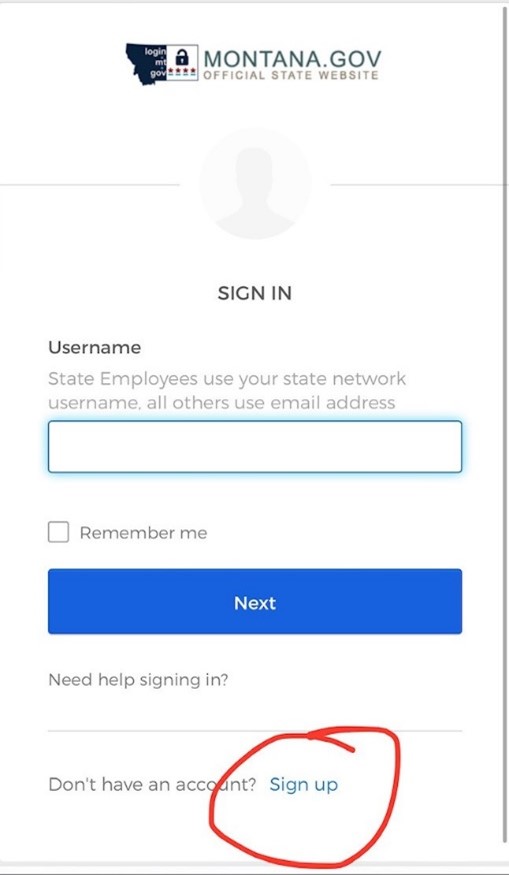
- Set up an Okta account by going to: http://mtgov.okta.com using Microsoft Edge as your browser.
- You will see a sign in page and a place that says “Don’t have an account? Sign up.” Click “Sign Up”.
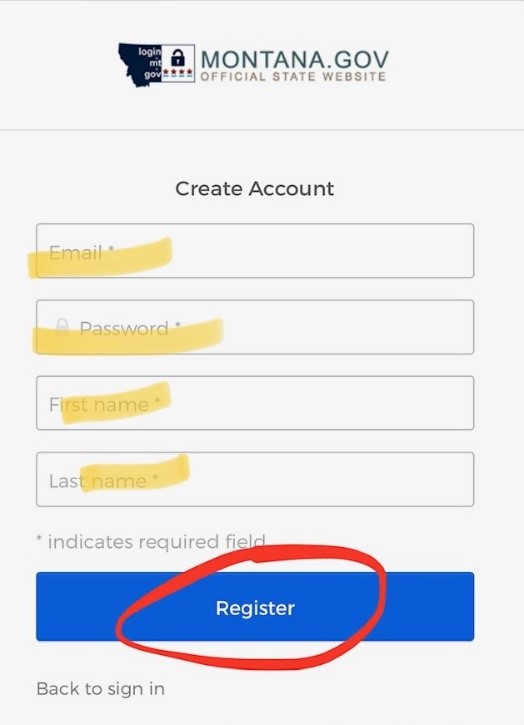
- You will then get a page that says “Create Account” at the top. Please use your work email – the same email you put on your OM300B form - as your email address and then create your own password (please keep it in a safe place somewhere). Then enter your first and last name and click “Register” when you are complete.
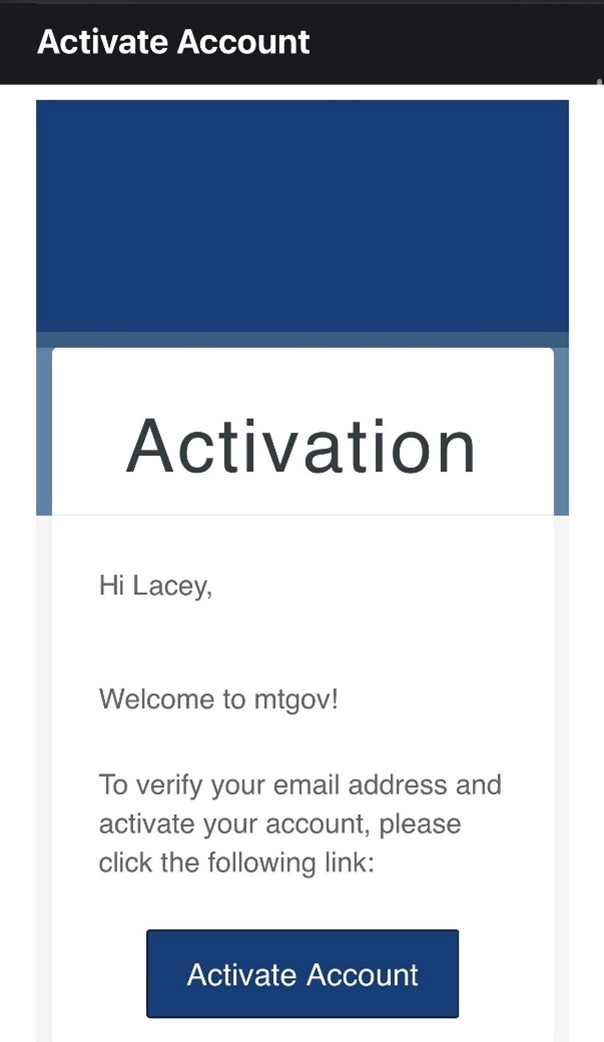
- After you complete the above, you will be sent a verification email from OKTA titled “Activate Account” to the email you used to register. It may take several hours to receive this email. When you get that email, go ahead and open it and click the button that says “Activate Account.”
- This brings you into OKTA on your My Apps page.
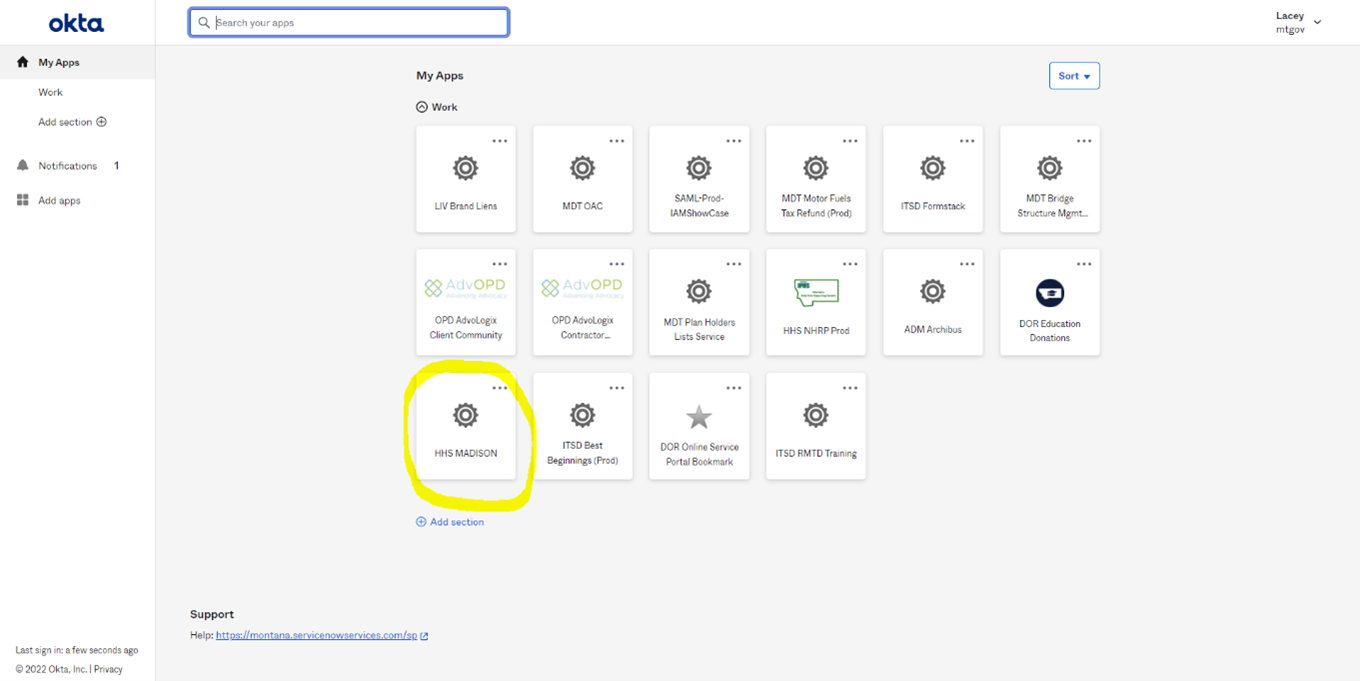
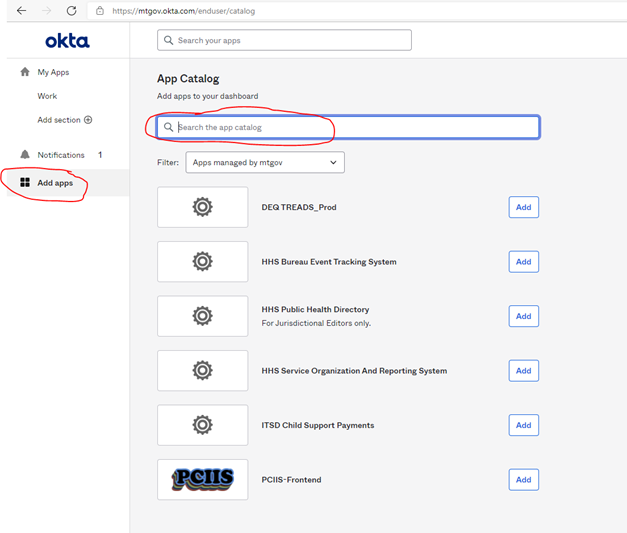
- If you DON’T see the HHS Madison icon, click “Add apps” form the left-hand menu, search “HHS MADISON” in the search bar, then click the “Add” button to the right of the app.
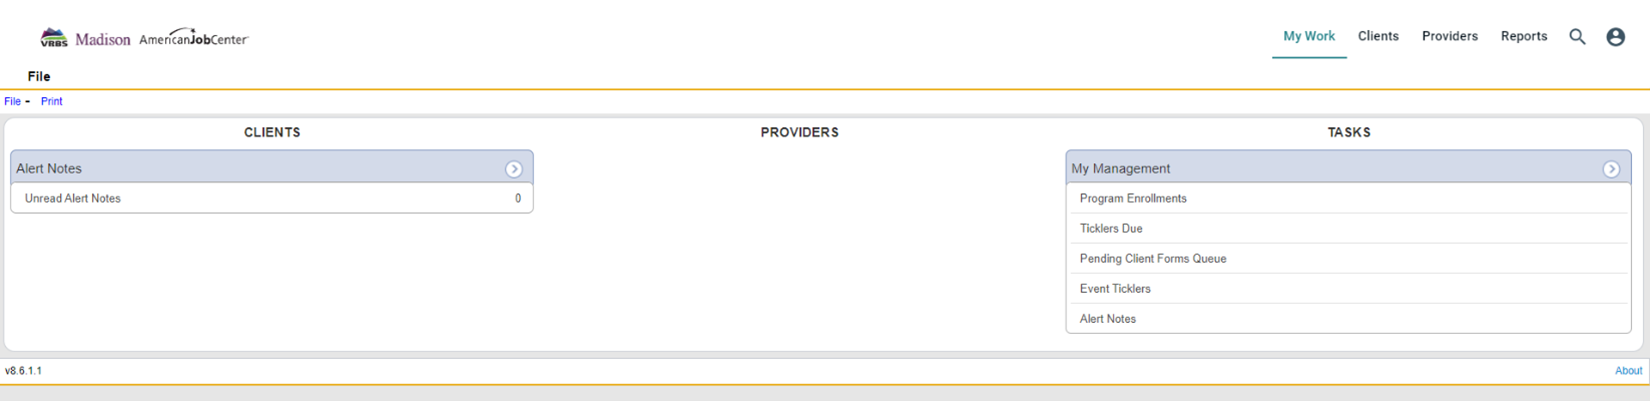
- Once you have turned in the OM300-B and been notified by Lacey via email that you have a Madison account set up, you can then click on the “HHS Madison” icon on your Okta “My Apps” screen. When you click on “HHS Madison,” one of two things will happen. Either you will be asked to enter your Okta credentials for a second time which will then get you to your Madison home page OR you will be brought directly into your Madison "My Work" home page.
- Login to Madison.
- Click the search icon
 in the top right-hand corner of the screen, type in the client’s last name, select “Last Name” to search by, and click the Search Button
  .
.
- Click on the client’s name in the search results grid to select that client.
- Find the client in Madison.
- Click on the Service Deliveries tab.

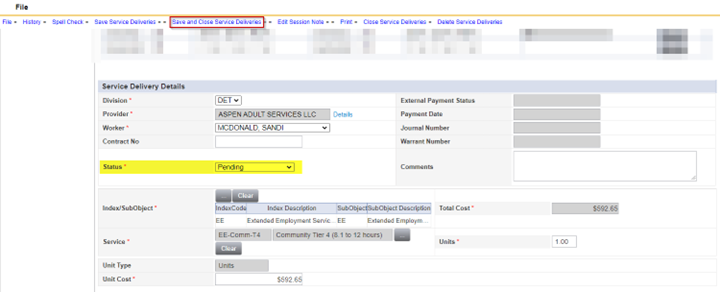
- From the File menu in the top left-hand corner, click Add Service Deliveries.
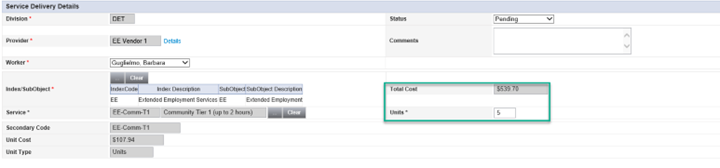
- Under the Activity Times header, enter the Start Date as the first day of the month (ex. 7/1/21) and End Date as the last day of the month (ex. 7/31/21). NOTE: Do NOT input Start Time and End Time.
- Set Provider by selecting Provider from dropdown list.
- Click the ellipsis for Index/Subject under the Activity Services
- A Dialog box will pop up. Select Extended Employment Services from the list view grid. The pop up will close and return to the Service Deliveries details page.

- Click on ellipsis for Service
- For Tier 1-6 Community, Tier 1-3 Crew, and Tier 1-7 Facility, use the next two lines of instruction, then skip to step 4.
- A dialog box will pop up. Select appropriate service from list view grid. The pop up will close and return to the Service Deliveries details page.
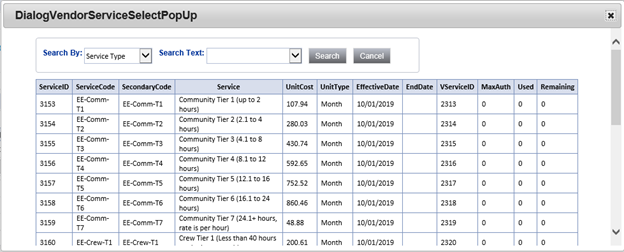
- Enter “1” for Units and click away or hit the “Enter” button on your keyboard. The screen will refresh, and the Total Cost field will populate.
- A dialog box will pop up. Select appropriate service from list view grid. The pop up will close and return to the Service Deliveries details page.
- For Tier 7 Community, use the next two instructions instead.
- A dialog box will pop up. Select EE-Comm-TV Community Tier 7 (24.1+ hours, rate is per hour) service from list view grid. The pop up will close and return to the Service Deliveries details page.
- Enter the number of hours in the Unit field and click away or hit the “Enter” button on your keyboard. The screen will refresh, and the Total Cost will populate.
- On the Service Deliveries screen, from the File menu, select Add Session Note.
- A Session/Billing Note screen will open and you will need to:
- Enter Job Title.
- Enter Employer.
- Enter Date Hired.
- Do NOT enter Duration Total Minutes. This will auto-populate as you fill out Duration for each of the notes.
- Do NOT enter Total Monthly Duration In Hours. This will auto-populate as you fill out Duration for each of the notes.
- Enter the Note Date.
- Enter the Duration. The field is a numeric textbox, so enter time in total minutes.
- Enter the contents of your note in the Note
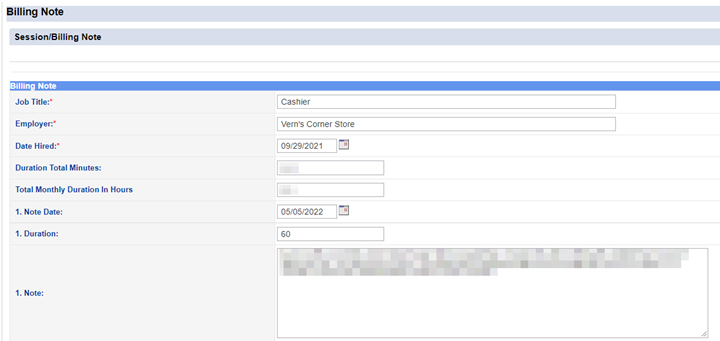
section. - If you have more than one note to enter, click the box next to Add Note 2?
- Once you have finished entering in all your notes, click Save and Close Session/Billing Note.
- This will bring you back to the Service Deliveries screen.
- If you are done inputting notes for the month and are ready to send them to the EE Program Manager for review and payment, change the Status of the Service Delivery to Ready for EE Review. Then click Save and Close Service Deliveries.
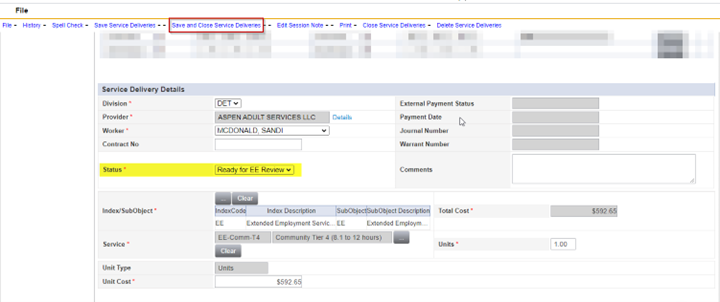
- If you are NOT done inputting notes for the month and are NOT ready to send them to the EE Program Manager for review and payment, leave the Status in Pending and click Save and Close Service Deliveries.
- If you are done inputting notes for the month and are ready to send them to the EE Program Manager for review and payment, change the Status of the Service Delivery to Ready for EE Review. Then click Save and Close Service Deliveries.
- Find the client in Madison.
- Click on the Service Deliveries tab.
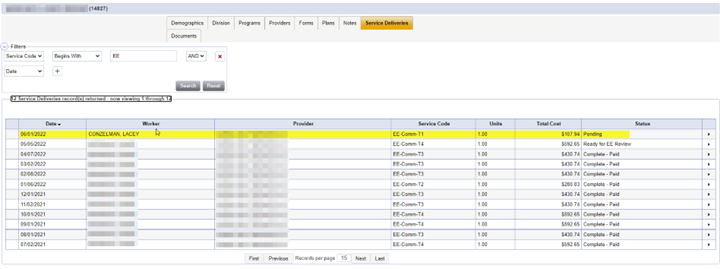
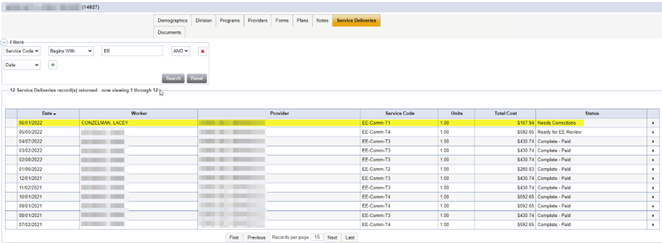
- You will see that you have a List View Grid showing all the Service Deliveries that have been input for this client so far and the Status of those Service Deliveries. Click anywhere on the Service Delivery line that you need to add additional notes to. It is likely the line that has a Status of Pending.
- That will bring you into the Service Delivery screen. Click Edit Session Note from the File menu.

- This will bring you back to the Session/Billing Note you already started. Fill in the rest of the notes that are needed and then click Save and Close Session/Billing Note when you are done.
- This will bring you back to the Service Deliveries screen.
- If you are done inputting notes for the month and are ready to send them to the EE Program Manager for review and payment, change the Status of the Service Delivery to Ready for EE Review. Then click Save and Close Service Deliveries.
- If you are NOT done inputting notes for the month and are NOT ready to send them to the EE Program Manager for review and payment, leave the Status in Pending and click Save and Close Service Deliveries.
NOTE: Repeat this process until you are ready to submit the notes for review and payment.
- If you are done inputting notes for the month and are ready to send them to the EE Program Manager for review and payment, change the Status of the Service Delivery to Ready for EE Review. Then click Save and Close Service Deliveries.
- Find the client in Madison.
- Click on the Service Deliveries tab.
- You will see that you have a List View Grid showing all the Service Deliveries that have been input for this client so far and the Status of those Service Deliveries. Click anywhere on the Service Delivery line that has the status Needs Corrections.
- That will bring you into the Service Delivery screen. In the Comments section of the Service Delivery screen you will see a note from the EE Program Manager about what needs to be changed.
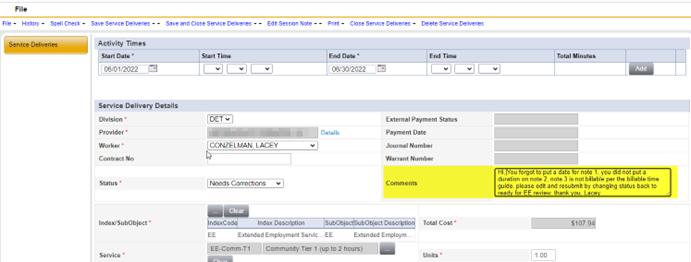
- Make the needed changes and save. Then change the status of the Service Delivery to Ready for EE Review and click Save and Close Service Deliveries.
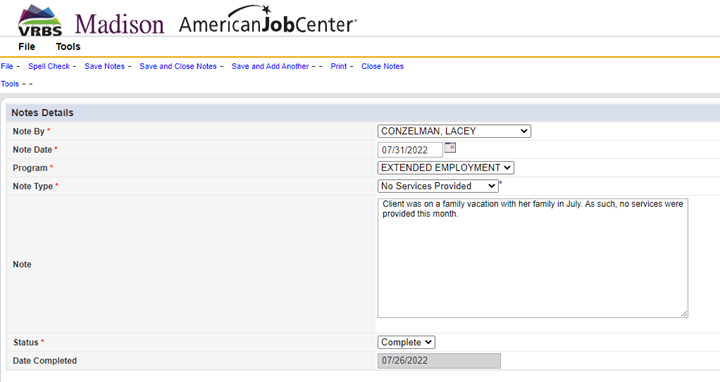
- Find the client in Madison.
- Click on the Notes tab.

- From the File menu in the top left-hand corner, click Add Notes.
- The Note By field will auto-populate with the name of the user.
- Select the correct date for Note Date
Note: If inputting one note for the month to indicate the full month was not billable, the date used here should be the last day of the month (ex. 7/31/22). The system will automatically pick up the date you are inputting the note in the Date Completed field. - Select Extended Employment for the Program field.
- Select the Note Type that is most appropriate for the note being input. This will most often be either “Case Note (Non Billable)” or “No Service Provided”
- Input the contents of the note in the Note section text box.
- Once your note is input, change the Status field to Complete.
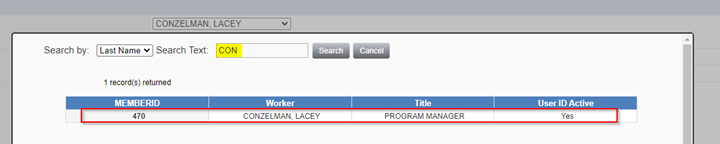
- Next, click the ellipses under Note Recipients.

- A separate search box will appear. Type “CON” into the search box and click “Search.”
- Select “Conzelman, Lacey Program Manager” from the list by double clicking on the name.
- See that Lacey has been added as a note recipient because her name is now present on this screen. This will send Lacey a notification within the Madison system that a client note has been input and needs to be reviewed.
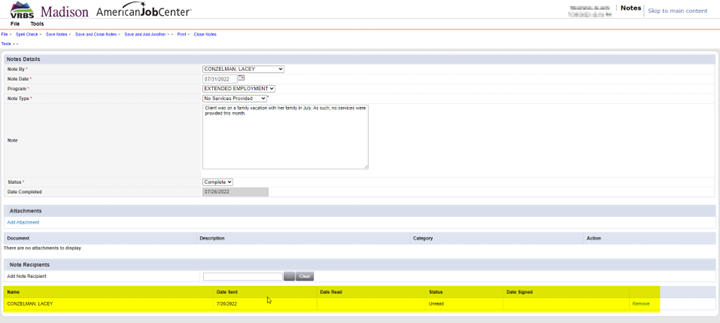
- From the File menu in the top left-hand corner, click Save and Close Notes.
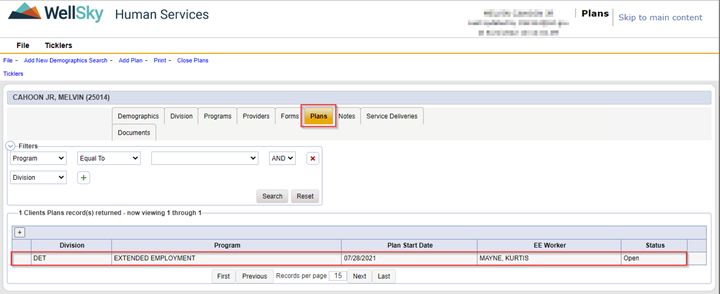
- Find the client in Madison.
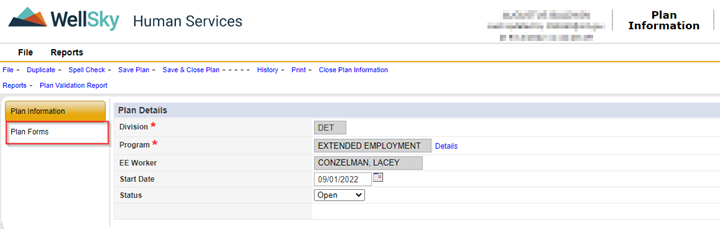
- Click on the Plans tab.

- From the File menu in the top left-hand corner, click Add Plan.
- Set Division to DET.
- Set Program to Extended Employment.
- EE Worker defaults to current user.
- Enter the first day of the month in which the client is starting EE for the Start Date.
- Change Status from Pending to Open.
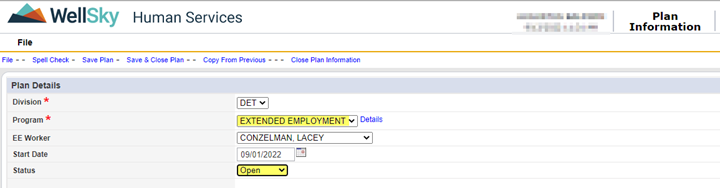
- From the File menu in the top left-hand corner, click Save Plan.
- Click Plan Forms
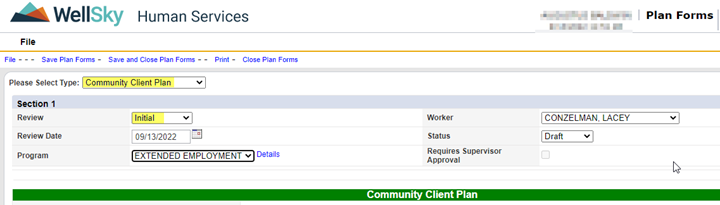
- From the File menu in the top left-hand corner, click Add Plan Forms.
- Select Community Client Plan from the drop-down menu. The form will display.
- Set Review to Initial.
- Data Entry Date defaults to today’s date.
- Set Program to Extended Employment.
- Worker defaults to current user.
- Status defaults to Draft.
- Complete the form.
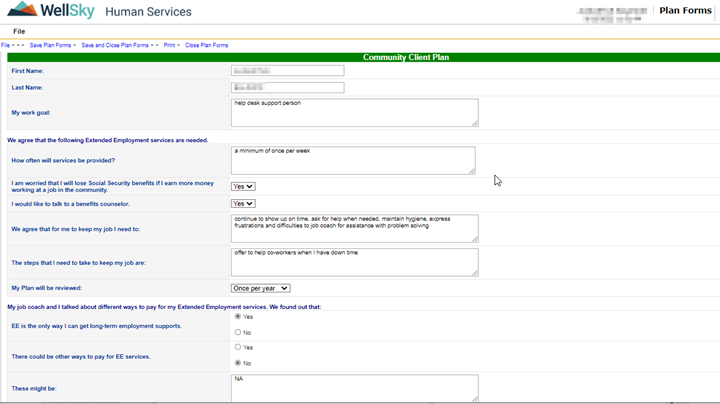
- Once you have the form filled out, change Status (at the top of the page) to Pending.
NOTE: **setting status to Pending will send the form to EE Program Manager for review. EE Program Manager will review and change status of form to Complete**
- From the File menu in the top left-hand corner, click Save Plan Forms.

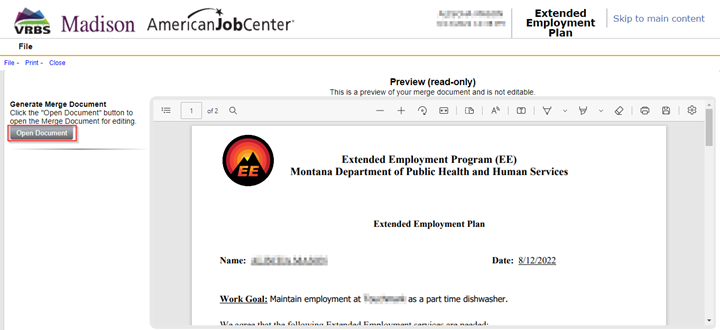
- From the Word Merge menu in the top left-hand corner, click Extended Employment Plan.
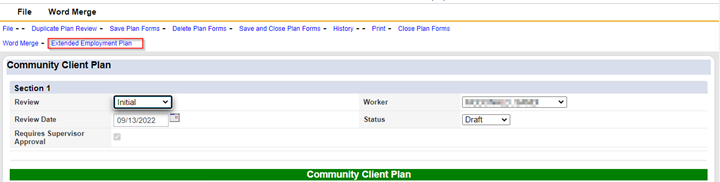
- Click the Open Document button to open the plan in Word. Then print the Plan from Word to give to the client.
NOTE: When completing an annual review for an EE client, the job coach must complete the following 3 things during or after the annual meeting with the client:
- Update the EE Plan
- Complete the Annual Review Form
- Document the meeting in Service Deliveries.
Update EE Plan:
- Find the client in Madison.
- Click on the Plans tab and Select the Extended Employment Plan from the list view grid.
- Select Plan Forms subpage and click the most recent plan from the list view grid
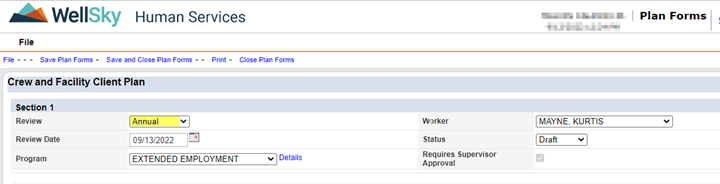
- The existing plan will open. From the File menu in the top left-hand corner, click Duplicate Plan Review.
- A new plan will automatically be created with the same information as the previous plan.
- Set Review to Annual.
- Set Review Date to today’s date.
- Program will default to Extended Employment.
- Worker defaults to current user.
- Status defaults to Draft.
- Complete the form by updating the information in all of the boxes based on discussions had during the annual review meeting between the client and job coach.
- Once you have the form completely filled out, change Status (at the top of the page) to Pending.
NOTE: **setting status to Pending will send the form to EE Program Manager for review. EE Program Manager will review and change status of form to Complete** - From the File menu in the top left-hand corner, click Save Plan Forms.
- From the Word Merge menu in the top left-hand corner, click Extended Employment Plan.
- Click the Open Document button to open the plan in Word. Then print the Plan from Word to give to the client.
Complete the Annual Review Form:
- Go back to the Client’s record and click on the Forms tab.

- From the File menu in the top left-hand corner, click Add Form.
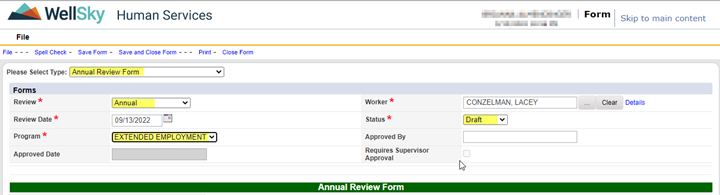
- Select “Annual Review Form” from the drop-down menu at the top of the screen.
- Set Review to Annual.
- Review Date will auto-populate with today’s date.
- Set Program to Extended Employment.
- Worker will auto-populate with the current user’s name.
- Leave Status in Draft until the form is completed
- Complete the form.
- First Name and Last Name will auto-populate with the name of the client record you are in.
- Mark Yes or No for each of the items in the list.
- Input details of the annual review meeting including progress made by client over the last year into the Annual Review Narrative section.
- Type name into EE Provider spot to electronically “sign” the form.
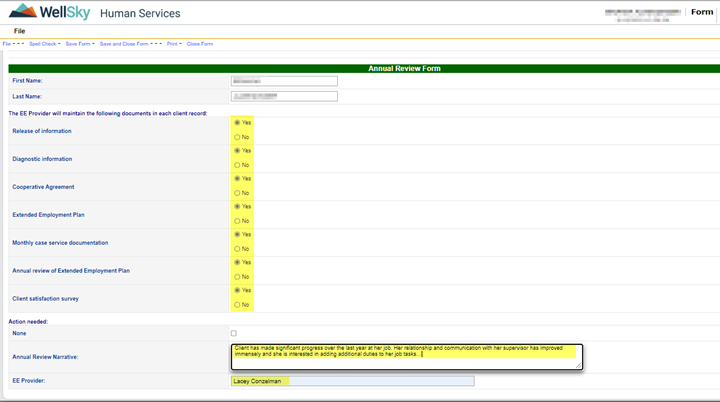
- Change Status to “Pending.”
NOTE: setting status to Pending will send the form to EE Program Manager for review. EE Program Manager will review and change status of form to Complete - From the File menu in the top left-hand corner, click Save Form.
- From the Word Merge menu in the top left-hand corner, click EE Annual Review.
- Click the Open Document button to open the plan in Word. Then print the EE Annual Review from Word to put in the provider’s client file.
Document the annual meeting in Service Deliveries:
- Go back to the Client’s record and click on the Service Deliveries tab.
- You will see that you have a List View Grid showing all the Service Deliveries that have been input for this client so far and the Status of those Service Deliveries. Click anywhere on the Service Delivery line that you need to add additional notes to. It is likely the line that has a Status of Pending.
- That will bring you into the Service Delivery screen. Click Edit Session Note from the File menu.
- This will bring you back to the Session/Billing Note you already started. Fill in your annual review meeting note. Since the narrative of the meeting is already in the Annual Review Form, you can copy and paste the Annual Review Narrative into the session/billing note or simply input “Annual review meeting held on this date and associated documentation completed” into the Note space.
- Click Save and Close Session/Billing Note when you are done.
- This will bring you back to the Service Deliveries screen.
- If you are done inputting notes for the month and are ready to send them to the EE Program Manager for review and payment, change the Status of the Service Delivery to Ready for EE Review. Then click Save and Close Service Deliveries.
- If you are NOT done inputting notes for the month and are NOT ready to send them to the EE Program Manager for review and payment, leave the Status in Pending and click Save and Close Service Deliveries.
NOTE: Repeat the process of addition additional notes until you are ready to submit the notes for review and payment.
- If you are done inputting notes for the month and are ready to send them to the EE Program Manager for review and payment, change the Status of the Service Delivery to Ready for EE Review. Then click Save and Close Service Deliveries.
- Login to Madison.
- Click on the Reports Chapter.

- Select “Voc Rehab” from the drop-down menu for Type.
- Click the Retrieve button.
- Click the circular radio button to the left of the “EE Service Deliveries” report.
- Click the Run Report button.
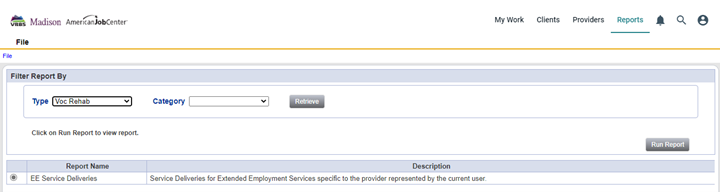
- A new screen will appear. Input the desired parameters and click the View Report button.

- Data related to the parameters selected will appear below. Export the data to excel by clicking on the disk & arrow button and selecting Excel from the drop down.
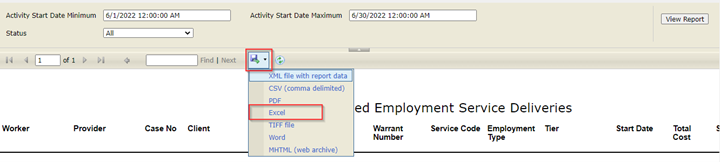
- Open the spreadsheet in Excel and filter the spreadsheet as needed to view the desired information.
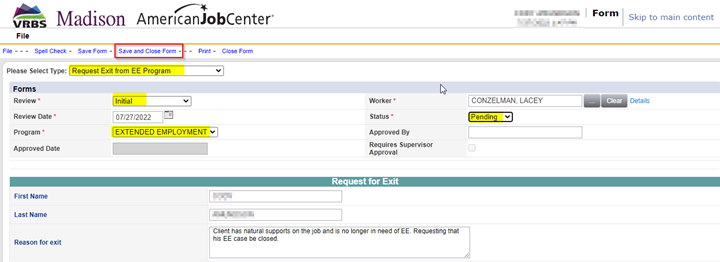
- Find the client in Madison.
- Click on the Forms tab.
- From the File menu in the top left-hand corner, click Add Form.
- Select “Request Exit from EE Program” from the drop-down menu at the top of the screen.
- Select “Initial” for Review.
- Review Date will auto-populate with today’s date.
- Select “Extended Employment” for Program.
- Worker will auto-populate with the user’s name.
- Leave Status in “Draft” until the form is completed.
- Complete the form.
- First Name and Last Name will auto-populate with the name of the client record you are in.
- Type in the Reason for exit in the available text box.
- Change Status to “Pending.”
- Click Save and Close Form.
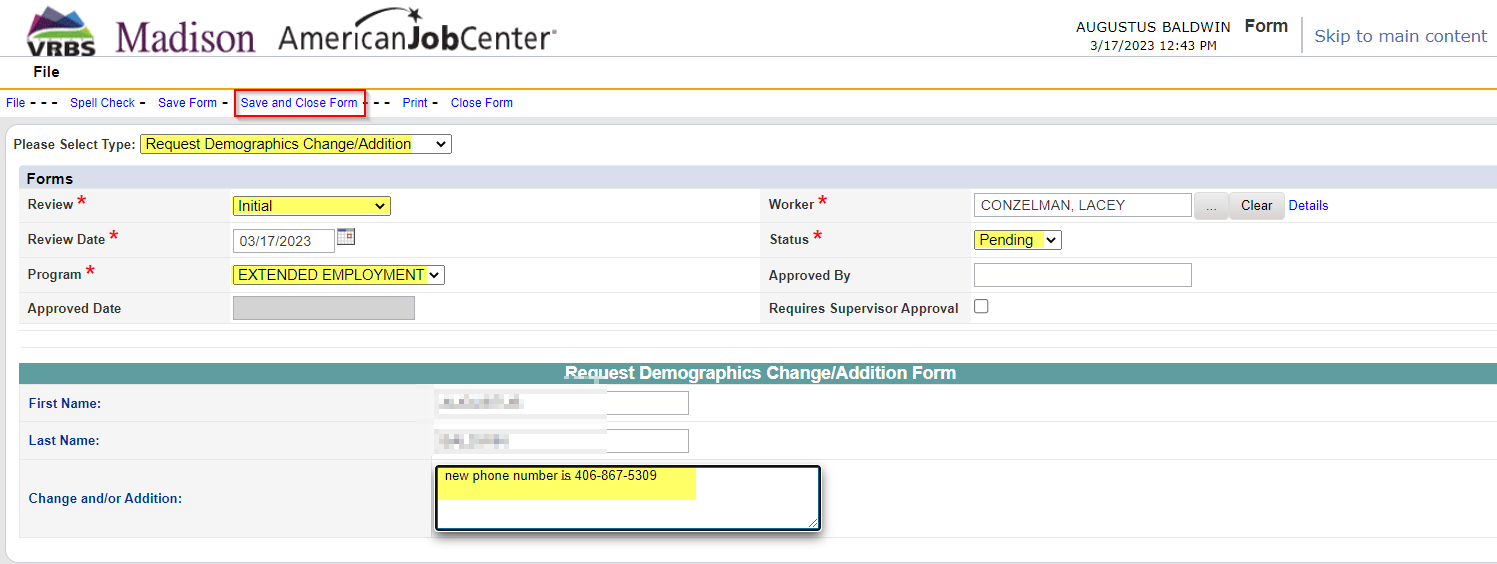
Find the client in Madison.
Click on the Forms tab.
From the File menu in the top left-hand corner, click Add Form.
Select “Request Demographics Change/Addition” from the drop-down menu at the top of the screen.
Select “Initial” for Review.
Review Date will auto-populate with today’s date.
Select “Extended Employment” for Program.
Worker will auto-populate with the user’s name.
Leave Status in “Draft” until the form is completed.
Complete the form.
First Name and Last Name will auto-populate with the name of the client record you are in.
Type in the needed demographic change/addition in the available text box.
Change Status to “Pending.”
Click Save and Close Form.